Tuesday, November 29, 2011

Bedroom Dreams

Let's play a bedroom game...no, not that kind of bedroom game! It's called "Can You Guess What Dani's Dreaming Of?" Let's begin.


Ding, ding, ding! If you guessed "Yellow and Gray Color Scheme," give yourself a good ol' pat on the back! 

I have been obsessed with this color scheme for a few years now. Ever since I first saw picture number 2 (yellow Ikea poster bed) in Domino Magazine back in 2008. Micah was not so into it at first, but when I showed him pictures 3 and 4, he really warmed up. I put together a very, very preliminary mood board of what I would like to see in the master bedroom. Sorry if it's a bit small, but it's my first time making a digital mood board so give me some props people. 


Now I am not saying that I'm running out and buying all this stuff. I am just in the initial planning stages and wanted to put out a feeler and see if I'm crazy, or if this really does work.

I know the color scheme is a bit hard to see, so here is a close up:


Also,  for those of you interested, here are links to most of the items on the mood board, in case you would like to get a closer look:

So what are you thoughts? Are you feeling the color scheme? Have you gone bold in your house? As always, would love to hear from you!


Sunday, November 27, 2011

Kitchen Dreams

The current state of our kitchen is, well, non existent, as evident by this picture:


In case you have forgotten, it originally looked like this: 


We hadn't intended on demolishing the whole kitchen, but since we were replacing the floors, we had to move the cabinets. In the process, we realized their poor quality and sent them packing. 


We are in the process of  putting dry wall up, but we will be living kitchen-less for a short while. We do plan on making a little make-shift kitchen to get us through these "dark ages," that way we can cook and avoid the heavy price tag that comes with eating out.


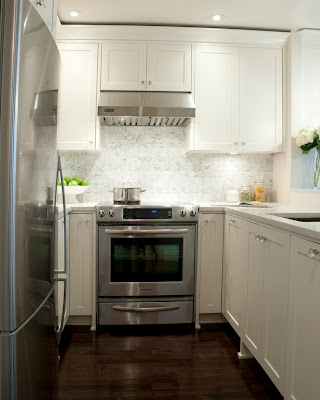
So now, for the fun part...thinking of our dream kitchen. We knew right away that we wanted to go with something classic. We are avoiding anything too modern, that will go out of style over the next few years. We are investing so much in to our house, we want the look to be timeless. Micah and I both agreed on a white shaker style kitchen and found some images to share with everyone so you get a better idea of what we are going for.

These pictures are some examples of the type of cabinet style we are going for, known as a shaker.


Notice how all the above kitchens are pretty much white on white? That's my dream. However, there is someone else chiming in, and the Mr. is not so into this white on white action. Micah would like more of a contrast look, like this:


Would love to hear all of your opinions on the kitchen? What do you like? White on white or a little darkness thrown in to the mix. I most likely will have to give in to Micah since he has agreed to give me open shelving in the kitchen! Here's my open shelving inspirations:


I just think that shelves open up the kitchen so much. Our kitchen is quite small and cabinets running all along the wall would really close it in. 


Well that pretty much sums up our kitchen dreams. Chime in people! I am the most indecisive gal ever and I value my friends and family opinion more than ever!

Saturday, November 26, 2011

Hall Closet, A.K.A.-The Best Idea Ever!


As promised, I am back with photos of the hall closet! Here's the back story in case you forgot. This ol' 1959 house was, let's just say, short or some closet space! In our planning stages, we came up with the idea to move the hall wall up two feet and create a closet behind it. Here is what the living room wall originally looked like...


Notice how the wall butts up to the exterior wall? Well, after
a lil' bit of this...


We had something, that from the living room, looked like this...


Tada! We have a floating wall! Love it! Interestingly, considering we have lost 2 feet in the living room, the space feels so much bigger!

And now, for the whole reason we got all crazy with this wall, let's check out the back side.....


Now that is some storage! This closet alone, more than doubled the existing closet space of this house. And with the closets we are adding to the master bedroom, we will have more than enough space to store all our things. We are a family of four, and you know how things start adding up!

Tuesday, November 22, 2011

Houston, We Have A Closet

You may recall, considering I have mentioned it in nearly every post, that this house has some serious closet issues! We are making progress in that front! The framing is done and we have even started to put up some drywall. Let's take a trip down memory lane, starting with the master bedroom. 

This is the original closet. It is gone now and the space has now been incorporated into the master bathroom. More on that later!


Here is a shot of the wall that will be the home of the new closet.


And here is a very "in progress shot."


Yes, it's not a walk-in closet....that would be a dream, but it is way bigger then the closet we live with now, and much, much bigger then the closet that we would have had moving in! We are putting in some gorgeous doors. Check these babies out!


The hall closet is making headway as well! Will share pictures with everyone as soon as I can.

Sunday, November 20, 2011

Back to the Future

We thought that since we had some exposed walls, it might be fun to create a little time capsule for future martian friends to find. We didn't do anything too complicated. Just some money, the front page of today's newspaper, a note from the family, a photo, and a drawing from both kids. Speaking of kids, they are pumped to pick the perfect spot to put it in before the dry wall goes up. Man I wish I could find a time capsule from 100 years ago!

There Once was a Wall

Things are progressing over at our shack. We got busy doing some demo in preparation for our much needed storage space! If you recall, when we first got started the living room looked like this:


As mentioned in my floor plan post, this wall was going to turn in to a floating wall, as well as move up two feet to accommodate a closet on the other side. It all started with a hole...


And then progressed on....


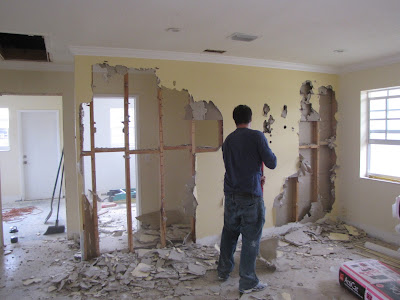
It was pretty simple, just a jackhammer and some might. We started by locating the beams and just beating away at the drywall, which was pretty thick. We assume that in the life of this 52 year-old home, it went through a few renovations. Once the drywall was down we started taking down the beams. If any of you guys are planning a little demo action of your own, make sure you consult a general contractor to make sure you are not messing with a supporting wall!


Of course clean up was a pain in the butt. However, it was well worth it. For now, the house is looking like this:


We are starting on framing the floating wall and I promise to share pictures as we move forward!

$ Bathroom $

Well, you know how it goes. You have a plan, you have a budget, and then spontaneously you say f*** it. We hadn't intended on demoing both bathrooms, really, I swear, but alas we did. In the process of making room for the master closets we decided that since we were damaging one wall, may as well take the whole thing out. The master bath is entirely bare, while the guest bath can be totally put back together, which is sad because I would really like to re-do it! So here is a few before shots of the guest bathroom:


The only major change in this bathroom, was removing the pesky wall that I pointed out in the first shot. It was just awkward, and taking up unnecessary room. By removing it, we can add a little storage area eventually, or a nice long vanity.

Here's what the bathroom is looking like in it's current state.


Moving on to the master bath, which got entirely gutted! There's the ol' closet that got the axe! RIP closet. 


Here is our tiny vanity. See the wall that it is leaning up against? That's the master closet. You can see how much room it is taking from this already too small bathroom.


And here's a shot of our single shower, which will transform into a double shower.


And without further adieu, the "in progress" shots! In this shot, you can see the removal of the closet that our A/C lived in.


And here's a shot from the master bedroom...Remember that little space? Yup, its what use to be the closet.


And another....


Check out the future shower! How spacious.


And a closer shot with the drywall up.


So now we have our predicament. We just can't afford to renovate both bathrooms. So we will be sharing the guest bath for a short time while we save up our pennies for the many things we want to do with this ol' shack!

Wednesday, November 16, 2011

Getting Down and Dirty

It's time to roll up the sleeves and get down and dirty. First up, the attic. When we moved the A/C up there we noticed that the attic had no insulation. As you can see by this lovely picture:


 Being the energy conscious folks that we are, we took a trip to good ol' Home Depot with the intention of purchasing blanket insulation rolls (Batt.) However, it turned out to be our lucky day. Home Depot had a deal on blown insulation with the free rental of a blower! This might seem like not so exciting news, but when your attic's highest peak is four feet, it is a welcome relief not to have to crawl through all the nooks and crannies. 


And of course, my little helpers.


Being that I am the smallest of the adults in our family, I had the lucky task of crawling up there and blowing a nice thick coat of insulation. The goal was to put an even layer, about 6 inches high. It sounded easy, but in full gear, and tight quarters it was not.


 Two hours later, we had something that looked like this:


So why insulate? Insulating your attic in an easy way to save on energy. It's great for the environment and for your wallet! A win-win.